How Do I Create a New Appointment Reminder?
In order to send timely reminders to your clients, your appointments have to be put on a schedule.
Our reminder scheduling application includes a scheduling calendar that can be used to manage the appointments for your office as well as to manage the reminders that are sent.
This part of the guide will show you how to Create an Appointment. Let’s get to it!
Create an Appointment
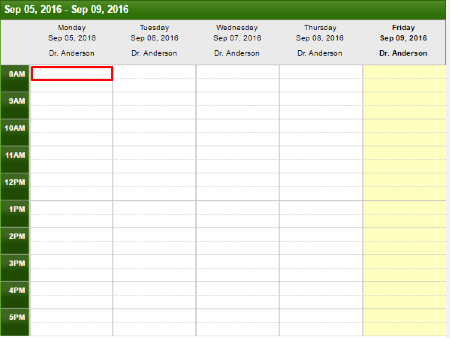
To create an appointment, simply click anywhere on the dashboard calendar at the time slot you wish to make the appointment for :
Once you have clicked on an open time slot, a dialog box will pop up so that you can enter the appointment information:
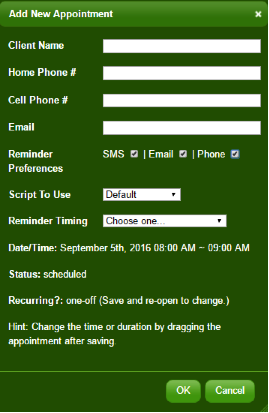
You now have several fields that you can fill out
Client Name: Enter the client’s name here. NOTE: If you have already had our support team upload your client list, once you start to type the name of your client, you will be prompted to choose a client from a drop-down list, which will then populate all of that client’s contact information.
Home Phone #: Enter a home phone number here. This is where client’s will receive phone reminders.
Cell Phone #: Enter a cell phone number here. This is the number that will be used to send SMS (also known as text) messages here. NOTE: If you aren’t sure whether you have a home or cell phone number, but only have one number, enter it in both places. We will attempt to send a SMS if you have that option chosen, but it will not go through if it is a land line.
Email: Enter the client’s email address here. This is the email address that we will use to send email reminders.
Reminder Preferences: You can choose what type of messages to send your client here. For example, you can uncheck the SMS box if your client prefers not to receive text messages.
Script to Use: If you have created more than one script for the reminders you want to send to clients, you will have a drop-down box here to choose the appropriate script. NOTE: If you have not created more than one script, this drop-down box will not appear here. You can create additional scripts by going to the Scripts tab.
Reminder Timing: NOTE: If you have not created more than one script, this drop-down box will not appear here. You can create additional reminder timings by going to the Account tab, then choosing “Change Reminder Timing Options.”
Date/Time: This informational field will tell you what time you have scheduled the appointment for.
Status: This informational field will tell you what status the appointment is in. For example, at creation, all appointments will be in a ‘Scheduled’ status. Other possible statuses include Confirmed, Showed, Notified, Requested Contact, Not Notified, Canceled, and No Showed.
Recurring: This informational field will tell you if this is a recurring appointment. Please see the next section for more on how to create a recurring appointment.